Clock In & Clock Out with Photo Verification
Guide to clocking in and out (absen) in the SEKAR app with photo and GPS verification.
Why is Clock-In Important?
Clock-in records:
- Clock-In Time: When you start work
- Clock-Out Time: When you finish work
- GPS Location: Where you are when clocking in
- Verification Photo: Proof you are actually at the location
All this data will be displayed in reports and supervisor dashboards.
Requirements for Clock-In
Before clocking in, ensure:
- GPS Active — Your device must capture GPS signal
- Camera Working — To take verification photo
- Internet Connection — WiFi or mobile data active
- Correct Location — You must be within ±100m radius of your assigned work area
Clock-In Steps
1. Open Clock-In Screen
Method 1 - From Home:
- Open the Home tab
- Tap the large "CLOCK IN" or "Absen Masuk" button
Method 2 - From Menu:
- Open the Menu tab (☰)
- Tap "Attendance" → "Clock In" or directly tap "CLOCK IN"
2. Check Shift Information
The screen will display:
┌─────────────────────────────┐
│   ATTENDANCE INFORMATION   │
├─────────────────────────────┤
│ Current Time               │
│   Monday, June 24, 2026    │
│   07:15                    │
│                            │
│ Shift Schedule             │
│   Shift 1: 06:00 - 14:00   │
│                            │
│ Assigned Area              │
│   Taman Bungkul            │
│                            │
│ GPS Coordinates            │
│   -7.295479, 112.762227    │
│   Radius: 100m             │
│                            │
│ [TAKE SELFIE]              │
└─────────────────────────────┘
Check:
- ✅ Shift has started (you're not early)
- ✅ You are in your assigned work area
- ✅ GPS coordinates show the correct location
Lateness Status: If you clock in later than your shift start time, a red "Late" badge will appear.
3. Take Selfie Photo
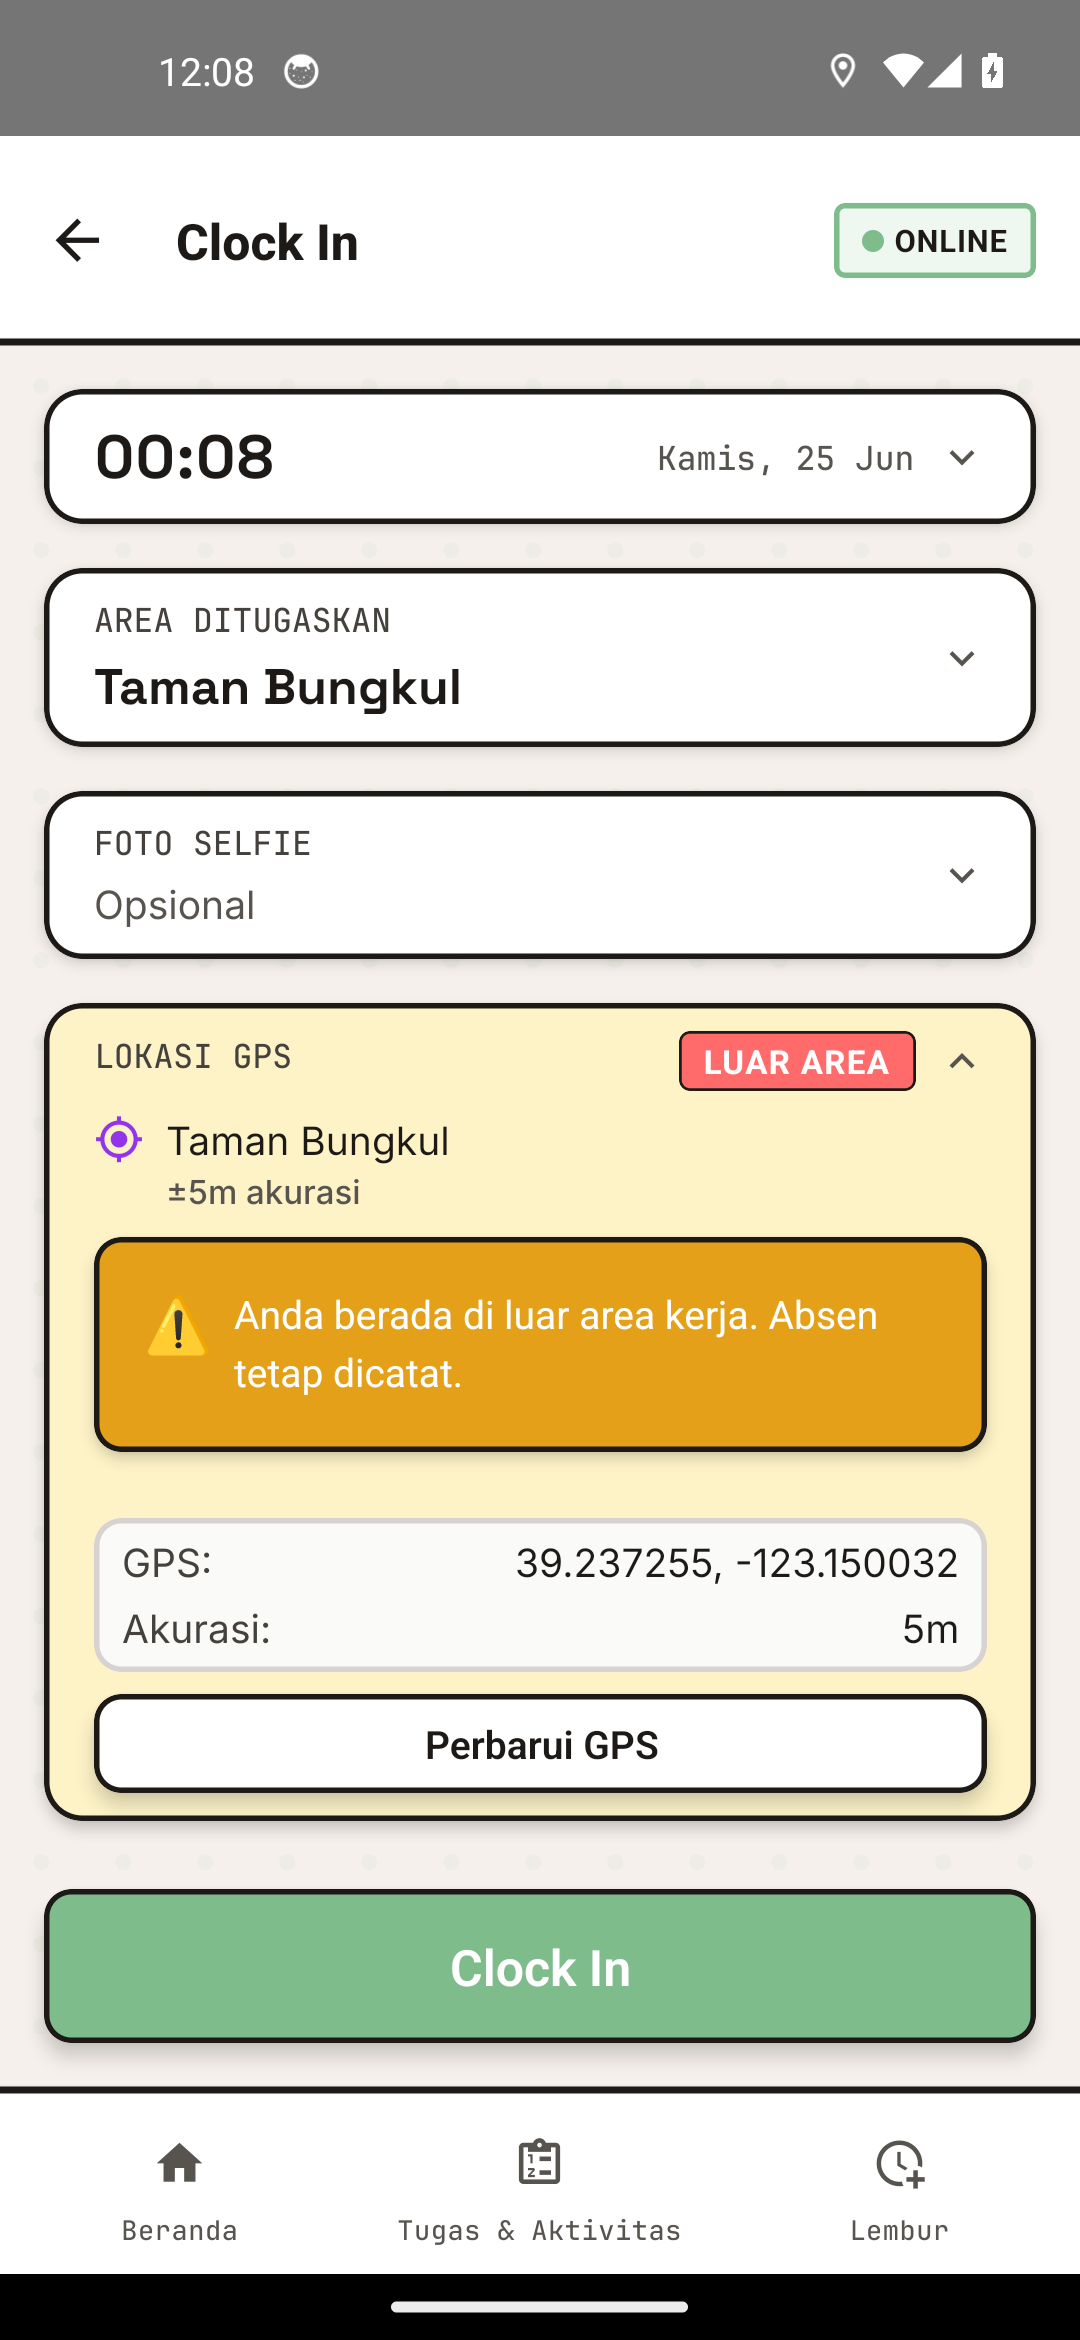
The clock-in screen showing shift information.
- Tap the "TAKE SELFIE" button
- Allow camera access if prompted
- Take a photo of yourself (face clear and visible)
- Check the photo — if unsatisfied, take another
- Tap "Use This Photo" to approve
Best Photo Tips:
- Good lighting (daytime, avoid direct sun glare)
- Face clear and visible
- Background can be work area or anywhere
- Relaxed pose, not awkward
The photo verification step during clock-in.
4. Confirm & Submit
- Check once more:
- Photo is correct
- Time is accurate
- Location is correct
- Tap "CONFIRM CLOCK IN" or "CLOCK IN"
- Wait for system to process (usually 2-3 seconds)
5. Success!
You will see a notification:
✓ Clock In Successful
  Time: 07:15
  Location: Taman Bungkul
Return to Home to see your clock-in time recorded.
Clock-Out Steps
Clock-Out Process Similar to Clock-In
-
Open Clock-Out Screen
- Home Tab → Tap "CLOCK OUT"
- Or Menu → Attendance → "CLOCK OUT"
-
Check Information
- Make sure you're still in your work area
- Clock-out time is appropriate (minimum work hours met)
-
Take Selfie Again
- Verification photo before leaving
- Same process as clock-in
-
Confirm Clock-Out
- Click "CONFIRM CLOCK OUT" or "CLOCK OUT"
- Wait for process to complete
-
Done!
- You have clocked out
- Work hours recorded in system
Important Note:
- If you clock out before normal work hours, it will be recorded as "Early Departure" (affects performance evaluation)
- Make sure your supervisor has approved early departure if needed
Lateness (Late Arrival)
What is Late?
You are considered Late if you clock in later than your scheduled shift start time.
Example:
- Shift 1 Schedule: 06:00 - 14:00
- You clock in at: 06:45
- Status: LATE (45 minutes late)
Lateness Indicators
Status will be displayed in red (🔴 LATE) in:
- Attendance card on Home
- Clock-In screen
- Attendance report
Does Lateness Matter?
Yes, lateness will:
- ✓ Be recorded in system
- ✓ Be visible in supervisor reports
- ✓ Affect performance evaluation
How to Explain Lateness?
Contact your supervisor/korlap to explain your reason for being late. They can:
- Record the reason in system
- Approve or reject the lateness
- Provide recommendation
Offline Mode (No Internet)
Clock-In While Offline
If internet connection drops:
- You can still clock in (photo will save locally)
- System will try to upload when connection returns
- Status will show 🟡 SYNCING
Make sure connection returns within 24 hours so data uploads correctly.
How to Sync Data
If offline data hasn't uploaded:
- Ensure internet connection is active
- Open SEKAR app
- Wait for "Sync Complete" notification
- Or open Menu → Profile → Diagnostics to check status
Clock-In Troubleshooting
"GPS Not Accurate / Outside Radius"
Issue: Error message "Your location is outside assigned area"
Possible Causes:
- GPS not locked (signal too weak)
- Actually outside the 100m radius
Solution:
- Wait 1-2 minutes for GPS to improve
- Make sure you're physically at the work location
- Try moving a few meters closer to area center
- If still fails, contact supervisor
System will not block clock-in, but GPS data will be recorded and supervisor will see it in monitoring.
"Cannot Take Photo"
Issue: App cannot access camera
Solution:
- Check camera permissions in Settings > App Permissions
- Make sure "Camera" permission for SEKAR is enabled
- Restart app
- If still fails, contact IT/admin
"Clock-In Failed to Upload"
Issue: "Failed to send data, check internet connection"
Solution:
- Check WiFi or mobile data connection
- Wait a moment and try again
- If offline, data will upload when connection returns
- Contact admin if continues to fail
"Already Clocked In But Not Showing on Home"
Solution:
- Close app completely (swipe up or use recent apps)
- Open app again
- Open Home tab
- Data will refresh
- If still not showing, contact admin
Clock-In Tips & Tricks
1. Clock In On Time — Arrive 5-10 minutes early before shift to avoid being late.
2. Clear Photo — Take photo with clear face, not blurry or silhouette.
3. Monitor GPS — If working in different areas, make sure you're at your assigned location when clocking in.
4. Regular Sync — If frequently offline, make sure app syncs every end of day.
Need more help? See FAQ & Help or contact your supervisor.